Create an ICO on Stellar Network With Custom Token
As you know, majority of the ICOs today are made on Ethereum (ERC20 token). But Ethereum is a big slow computer. If the intension is just to raise funds for the startup then Stellar can do a lot faster, better and cheaper! Note that stellar does not provide smart contracts, it is an open source platform for developing financial applications.
Advantage of using Stellar platform for ICO is its cheap transaction fees, faster transactions and getting ICO online very fast with very less development time. Stellar transactions cost fraction of a penny compared to $$ on Ethereum. Another great advantage of using Stellar is, tokens are available on Stellar Distributed Exchange in a day, where anyone can trade without waiting for it to get listed on other exchanges.
This article is about creating custom tokens on Stellar network and accepting BTC/ETH contributions in an ICO. You can read more on why Stellar can be a better ICO platform by Micha Benoliel on hackernoon.
Table of Contents
Create Token
Creating tokens on Stellar platform is very easy, we will be using stellar laboratory and test network for demo in this article. You can also run private network if you want, whole project is available on github to play with.
We need two accounts on Stellar to proceed, one is “Issuing account” and another is “Distributing account”. Well, to create tokens one account is enough but its always good to keep issuing account separate and use assets from distributing account.
Create issuing account
Go to Stellar Laboratory and click on Account Creator tab.
- Generate keypair
Save the public address and secret. - Fund the test Account
Generated account is not activated until it has some lumens, so fund the account with Friendbot available on the same tab.
Keep in mind that issuing account can generate as many tokens as it wants and hence tokens sent back to issuing account vanishes.
Create distributing account
Follow the same process mentioned above for generating account. There is no special difference between an issuing account and distributing account, its just a general concept to keep things separate. Save details of this account as well, we will be using this account to sell tokens.
Add trustline
In Stellar network no one can send any other token (asset) to anyone unless receiver trusts the asset. Here we want to send tokens from issuing account to the distributing account hence the distributing account needs to trust the asset in order to receive it. You can read more on trustline here. Adding trust is easy as creating a transaction on stellar network.
When someone buys token from the exchange they are already trusting the asset, but someone who has not purchased the asset before has to add the trustline in order to receive your tokens.
Visit the Transaction builder tab in the laboratory and fill the form as show.Make sure to enter addresses with the ones that you have generated.
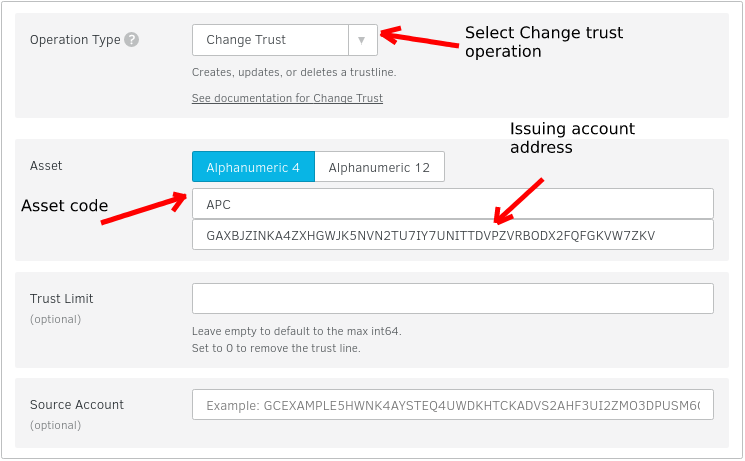
After filling in details, click on Sign in Transaction signer, enter distributing account secret when requested and submit the transaction. If the transaction is successful you have successfully added trust for the new asset, which issuing account is about to send.
Issue Tokens
Issuing token is making a payment to the distributing account from issuing account of total tokens you want to generate. After making the payment we will freeze the issuing account so that no more tokens can be generated at later point and total supply is fixed.
Go to the Transaction builder tab in the laboratory and fill in the form as show in below image. Enter source address as issuing account address, fetch the next transaction number and than set option as shown in below image.
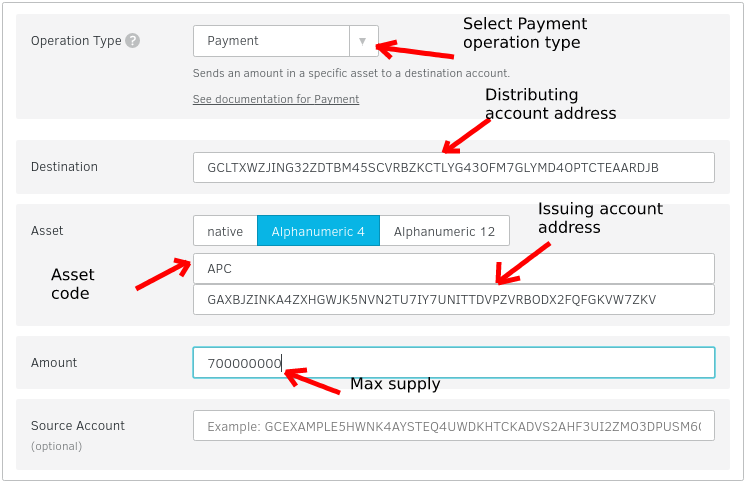
After filling in details, click on Sign in Transaction signer, enter issuing account secret when requested and submit the transaction. If the transaction is successful you have successfully created a token on Stellar platform and sent it to distributing account from where it can be sold.
Freeze total supply
You don’t want to issue infinite amount of tokens else the token will have no value and to make sure that no more tokens can be generated, the issuing account is freezed. Freezing the account is also making a transaction on the stellar network, everything on stellar network is transactions. After freezing, the account will not be able to make any transactions on the network.
Go to the Transaction builder tab in the laboratory and fill in the form as show in below image. Enter source address as issuing account address, fetch the next transaction number and than set option as shown in below image.
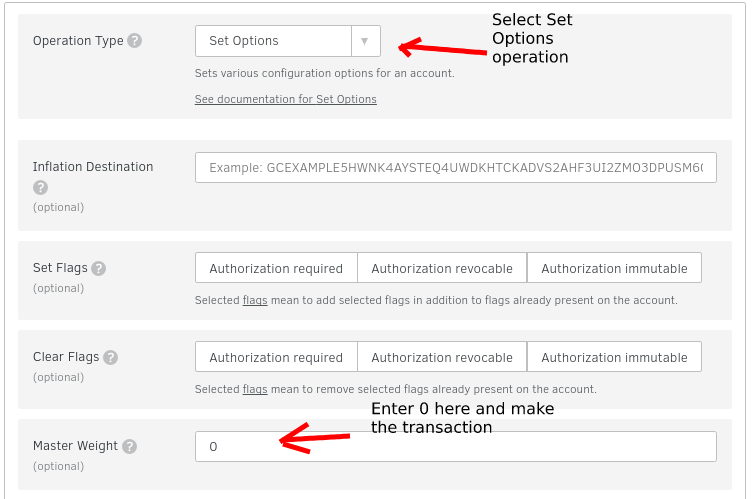
After filling in details, click on Sign in Transaction signer, enter issuing account secret when requested and submit the transaction.
Selling token
Selling token is also making a transaction on stellar network, thanks to its built in decentralized exchange. You put a sell order with desired price and anyone can buy the tokens by making a transaction. Its as simple as that. Of course this only works with assets on Stellar platform, but Stellar also has a service which can be used to accept BTC and ETH for the ICO. Let’s see it in action.
Accepting XLM (Lumens)
Let’s make a transaction from the distributing account to sell newly created token for 1 XLM each.
Go to the Transaction builder tab in the laboratory and fill in the form as show in below image. Enter source address as issuing account address, fetch the next transaction number and than set option as shown in below image.

The same way anyone can put a buy order with the matching criteria and tokens will be exchanged. The distributing account will receive 1 XLM for every 1 APC token sold.
After filling in details, click on Sign in Transaction signer, enter distributing account secret when requested and submit the transaction.
Accepting BTC/ETH
This will take a little bit of development work but is also very simple. After all everything is out of the box ready for making an ICO a small work here should be all fine. You need to manually setup a bifrost service on your side to receive BTC/ETH. Here’s the link to the github repo of bifrost.
All the steps you see above can be done programatically using stellar sdk available for all major platforms. Here’s link to the javascript SDK.
Thanks for reading!